
Webサイトやブログで1からテーブルを作成するのが面倒臭いと思っているあなた!簡単な雛形があれば、それをコピペして使えれば一番いいですよね。また少し編集すれば自分好みのテーブルが作成できればもっといいですよね。と私自身も思っていたので作成して見ました。よければ使用して見て下さい。
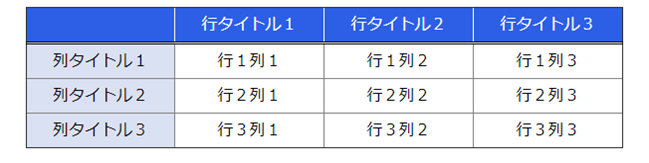
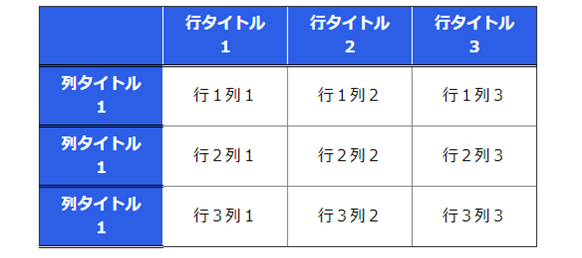
最終的にこのようなテーブルを作成します。では行ってみましょう!
デフォルトのhtmlとCSS
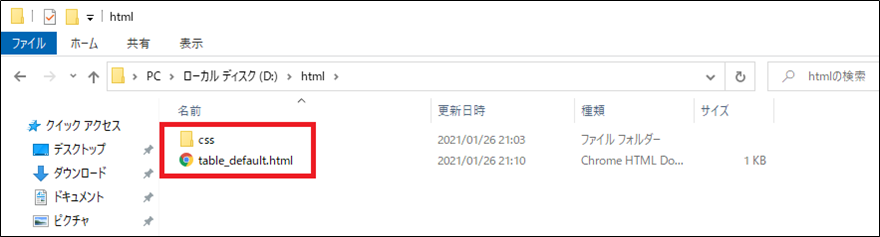
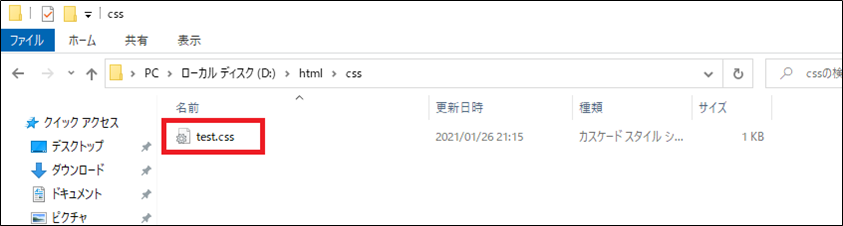
htmlファイルと同じ階層に「css」フォルダを作成し、その中に「test.css」ファイルをいれて下さい。
table_default.htmlファイル
<!doctype html>
<html>
 <head>
  <meta charset="UTF-8">
  <title>title_name</title>
  <link rel="stylesheet" href="css/test.css" type="text/css">
 </head>
  <body>
	<table border="1">
    	<tr>
    		<th>行タイトル1</th>
			<th>行タイトル2</th>
			<th>行タイトル3</th>
    	</tr>
       	<tr>
    		<td>行1列1</td>
			<td>行1列2</td>
			<td>行1列3</td>
		</tr>
		<tr>
    		<td>行2列1</td>
			<td>行2列2</td>
			<td>行2列3</td>
    	</tr>
	</table>
 </body>
</html>
test.cssファイル
table{
    border-collapse:collapse;
    background-color:white;
    width:400px;
    margin:auto;
}
tr{
    text-align: center;
}
Webブラウザで「table_default.html」を表示して見ます。
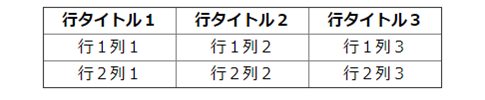
デフォルトのtableが出来ました。
行を追加したい
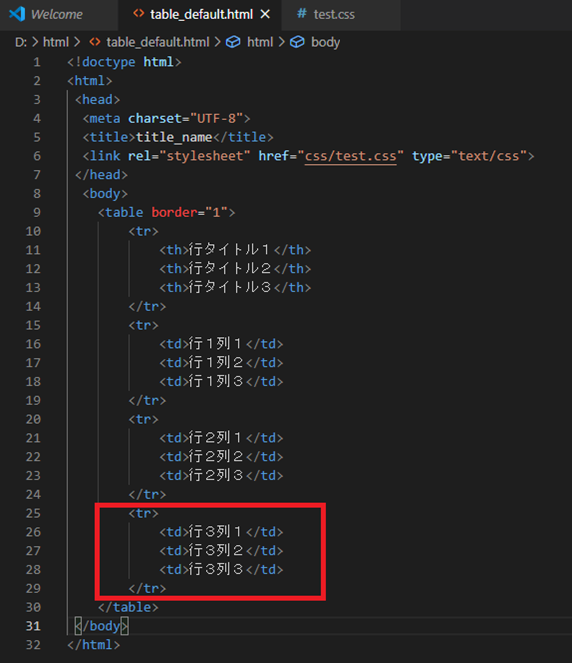
行を追加したければ赤枠の部分を下に追加して、「td」の部分を編集するだけです。ちなみに使用しているエディタはMicrosoftのVisual Studio Codeです。使用しやすいです。使用してみたいあなたはこちらからどうぞ。
行が追加されました。
行タイトルに色を付けてみましょう。
これだけでは味気ないのでタイトルに色を付けたりして装飾してみましょう。ここはスタイルなので「test.css」の中身を変更するだけでOKです。
test.cssファイル
table{
    border-collapse:collapse;
    background-color:white;
    width:400px;
    margin:auto;
}
tr{
    text-align: center;
}

th{
    background-color: rgba(14, 71, 226, 0.87);
    color:white;
    border-color:white;
    border-bottom:double black;
}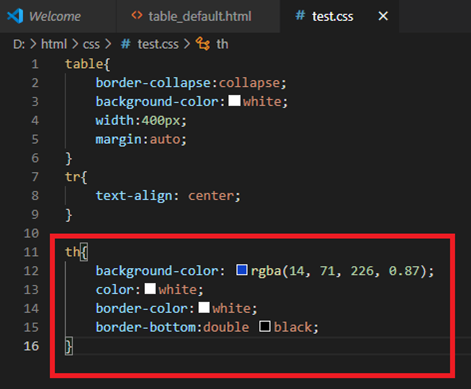
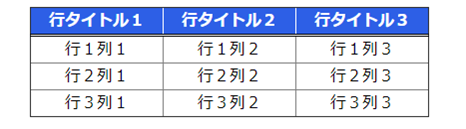
赤枠の部分を追加しました。
background-color: rgba(14, 71, 226, 0.87);背景の色を青っぽく変えてみました。「rgba」の後の数字を変えてみて自分好みの色に変えてみてください。
color:white;背景を濃い色にしたので文字を白にしています。「white」の部分を変更して文字の色を変えてみてください。
border-color:white;ボーダーの色を文字に合わせて白にしてみました。「white」の部分を変更して文字の色を変えてみてください。
border-bottom:double black;タイトルの下を二重線にしてみました。1つ手前の手順でボーダーの色を白にしてしまったので「boder-bottom」で下のボーダーを黒色にしました。これでタイトルの装飾は終わりにしておきます。
他にも色々と試してみて下さい。不要だなと思うところはcssから消せば良いだけです。下の二重線なんて要らないよってあなたは「border-bottom:double black;」を消せば良いだけです。
テーブルの中の文字の圧迫を緩和する
テーブルと文字の間の余白が少なく圧迫感があるので、 テーブルと文字の間の余白をとってあげましょう。ここでも見た目なのでcssファイルを変更するだけです。
test.cssファイル
table{
    border-collapse:collapse;
    background-color:white;
    width:400px;
    margin:auto;
}
tr{
    text-align: center;

}

th{
    background-color: rgba(14, 71, 226, 0.87);
    color:white;
    border-color:white;
    border-bottom:double black;
    padding:5px 20px 5px 20px;
}
td{
    padding:5px 20px 5px 20px;
}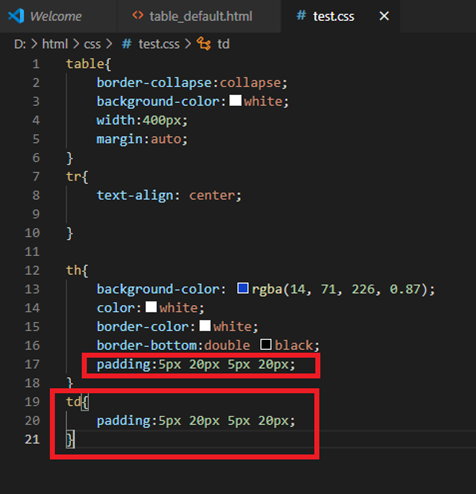
「th」と「td」に「padding」を設定します。padding-topなど四方向設定してもよいですが、paddingだけで四方向指定できます。 順番ですが上、右、下、左の順番で指定していきます。この場合だと上の余白:5px、 右の余白:20px、下の余白:5px、左の余白:20px。上と下、左と右は同じ余白をとる事が多いですので「padding:5px 20px;」と省略も出来ます。この場合、上下:5px、左右:20pxで編集しやすいですね。編集しやすくするか、細かく設定したいかで決めて下さい。これで一度見てみます。
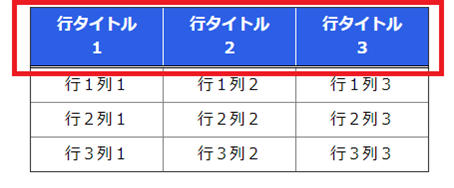
余白は余裕が出て良くなりましたが、タイトルは余白をとりすぎて2行になり、縦長になってしまいました。余白調節してもいいですが、 統一感を持たせる為にも数値はそのままで全体の大きさを設定しましょう。初めから「400px」にしていましたが「500px」に変更してみましょう。
横タイトルの最終CSSファイルです。htmlファイルは最初に貼ったものです。
test.cssファイル
table{
    border-collapse:collapse;
    background-color:white;
    width:500px;
    margin:auto;
}
tr{
    text-align: center;
}

th{
    background-color: rgba(14, 71, 226, 0.87);
    color:white;
    border-color:white;
    border-bottom:double black;
    padding:5px 20px;
}
td{
    padding:5px 20px;
}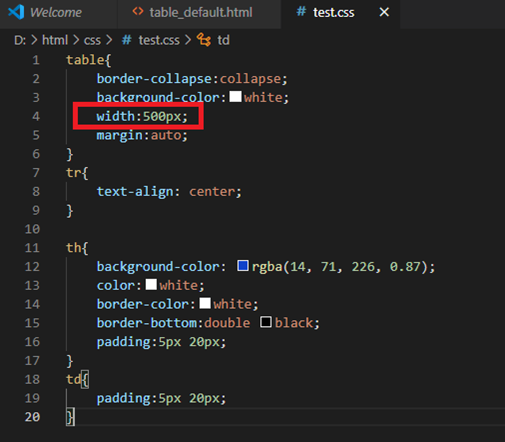
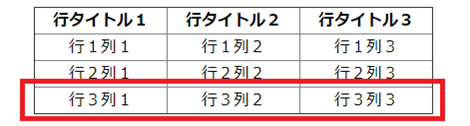
tableの「width」の値を「500px」に変更して見ました!見てみましょう。どうでしょうか??
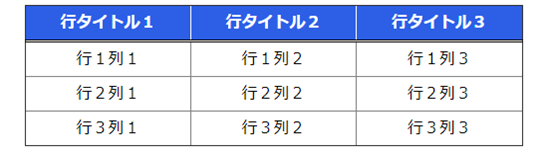
丁度よくなりました。これで基本的なテーブルは出来たかと思います。
列タイトルを入れてみる!
ちょっと縦のタイトルも入れたくなったのでおまけでやってみましょう。
table_default.html
<!doctype html>
<html>
 <head>
  <meta charset="UTF-8">
  <title>title_name</title>
  <link rel="stylesheet" href="css/test.css" type="text/css">
 </head>
  <body>
	<table border="1">
    	<tr>
			<th></th>
			<th>行タイトル1</th>
			<th>行タイトル2</th>
			<th>行タイトル3</th>
    	</tr>
       	<tr>
			<th>列タイトル1</th>
			<td>行1列1</td>
			<td>行1列2</td>
			<td>行1列3</td>
		</tr>
		<tr>
			<th>列タイトル1</th>
			<td>行2列1</td>
			<td>行2列2</td>
			<td>行2列3</td>
		</tr>
		<tr>
			<th>列タイトル1</th>
			<td>行3列1</td>
			<td>行3列2</td>
			<td>行3列3</td>
    	</tr>
	</table>
 </body>
</html>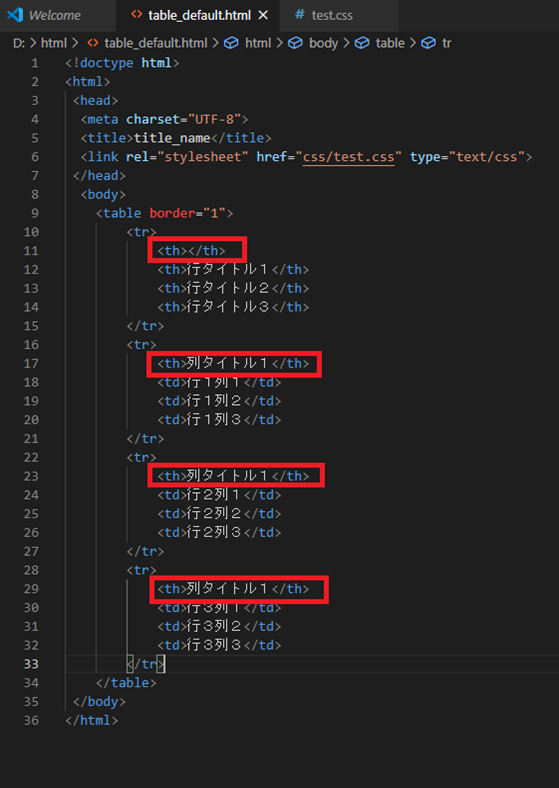
「tr」の中に「th」を入れてみましょう。最初の「th」はタグだけ入れます。どうなったか見てみましょう。
げげっ「th」タグのcssが列にも反映されています。列のタイトルだけ別のcssを適応させたいですね。 ここでは「class」を使用して1.列だけ別のcssを適応させます。
<th class="col_title">列タイトル1</th>また幅が足りなくなりまた2行になっているので幅を伸ばします。
width:600px;またタイトルの文字は自動で太くなっており図太いので細くします。
font-weight: lighter;縦横タイトルありの最終htmlファイルとCSSファイルです。
table_default.htmlファイル
<!doctype html>
<html>
 <head>
  <meta charset="UTF-8">
  <title>title_name</title>
  <link rel="stylesheet" href="css/test.css" type="text/css">
 </head>
  <body>
	<table border="1">
    	<tr>
			<th></th>
			<th>行タイトル1</th>
			<th>行タイトル2</th>
			<th>行タイトル3</th>
    	</tr>
       	<tr>
			<th class="col_title">列タイトル1</th>
			<td>行1列1</td>
			<td>行1列2</td>
			<td>行1列3</td>
		</tr>
		<tr>
			<th class="col_title">列タイトル2</th>
			<td>行2列1</td>
			<td>行2列2</td>
			<td>行2列3</td>
		</tr>
		<tr>
			<th class="col_title">列タイトル3</th>
			<td>行3列1</td>
			<td>行3列2</td>
			<td>行3列3</td>
    	</tr>
	</table>
 </body>
</html> 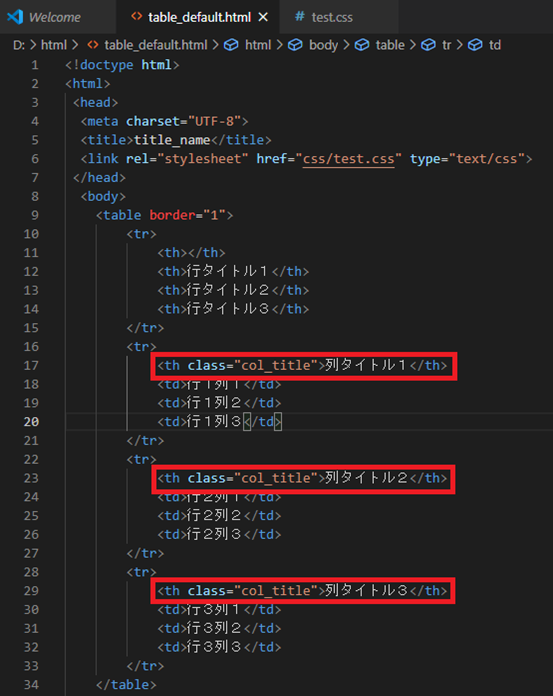
htmlファイルの「tr」の中に入れた「th」のすべてに「class=”col_title”」と入力してみましょう。
test.cssファイル
table{
    border-collapse:collapse;
    background-color:white;
    width:600px;
    margin:auto;
}
tr{
    text-align: center;
}

th{
    background-color: rgba(14, 71, 226, 0.87);
    color:white;
    border-color:white;
    border-bottom:double black;
    padding:5px 20px;
    font-weight: lighter;
}
td{
    padding:5px 20px;
}
.col_title{
    background-color: rgba(212, 220, 241, 0.87);
    color:black;
    border-color:gray;
    border-bottom:gray;
}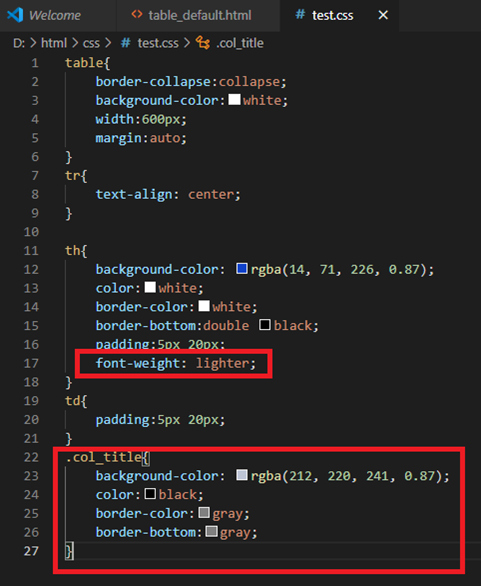
cssファイルの「th」に「font-weight:lighter;」を入力して文字を細くしてみます。
cssファイルにclassの「col_title」を作成しています。 classを指定する時は初めに「.」を付けます。これでclassの意味になります。「th」の時と同じ様に背景の色やボーダーの色、下線を変更しています。見てみましょう。

列タイトルもまあいい感じにできました。これをデフォルトとして細かく変更するのもよし、このまま使用するのもよし!という事で使用していこうと思います。あなたも良かったら使用して見て下さいね。
関連記事